Kittenblock插件开发指南 – 02
这一节我们主要讲述如何在kittenblock下开发一个跟硬件设备通信的插件
准备工作
为了和硬件通信我们首先需要准备一个硬件主板,目前kittenblock支持串口,tcp和udp还有蓝牙的硬件通信方式。只要您的硬件设备符合这三种其一就可以了。
其实要保证你的主板上已经烧录了通信用的固件,具体通信用的固件需要您执行开发,如果实在摸不着头脑可以参考一下kittenbot和minilfr的通信固件,源代码在kittenblock安装目录下的arduino\libraries\中kittenbot和minilfr中可以找到。我们推荐使用基于字符串的通信方式,这样可以节省大量的调试时间并且大部分CNC设备都是基于这种通信方式的。
插件改造
我们继续以上一节做的样板插件为基础,为了让插件可以选择硬件通信接口,我们首先需要在getInfo函数中使能插件状态按钮:
showStatusButton: true,
并且在类的构造函数中加上:
this.comm = runtime.ioDevices.comm;
this.session = null;
其中comm是kittenblock的通信io实体,session是通信上下文,具体在打开端口后进行实例化。
另外我们需要在类中添加以下函数,这些函数是scratch3的虚拟机引擎所要求的的回调函数,如果没有这些函数实现会导致通信流程失败。
// method required by vm runtime
startDeviceScan (){
    this.comm.getDeviceList().then(result => {
        this.runtime.emit(this.runtime.constructor.PERIPHERAL_LIST_UPDATE, result);
    });
}

connectDevice (id){
    this.comm.connect(id).then(sess => {
        this.session = sess;
        this.session.onmessage = this.onmessage;
        this.session.onclose = this.onclose;
        // notify gui connected
        this.runtime.emit(this.runtime.constructor.PERIPHERAL_CONNECTED);
    }).catch(err => {
        log.warn('connect peripheral fail', err);
    });
}

disconnectSession (){
    this.session.close();
}

getPeripheralIsConnected (){
    return Boolean(this.session);
}
我们来看看这时候的完整代码如下,重新加载插件后可以看到插件列表上方有个小的状态图标
const ArgumentType = Scratch.ArgumentType;
const BlockType = Scratch.BlockType;
const formatMessage = Scratch.formatMessage;
const log = Scratch.log;

class TestExt {
    constructor (runtime){
        this.runtime = runtime;
        this.comm = runtime.ioDevices.comm;
        this.session = null;

        this.runtime.registerPeripheralExtension('TestExt', this);
    }

    // method required by vm runtime
    scan (){
        this.comm.getDeviceList().then(result => {
            this.runtime.emit(this.runtime.constructor.PERIPHERAL_LIST_UPDATE, result);
        });
    }

    connect (id){
        this.comm.connect(id).then(sess => {
            this.session = sess;
            this.session.onmessage = this.onmessage;
            this.session.onclose = this.onclose;
            // notify gui connected
            this.runtime.emit(this.runtime.constructor.PERIPHERAL_CONNECTED);
        }).catch(err => {
            log.warn('connect peripheral fail', err);
        });
    }

    disconnect (){
        this.session.close();
    }

    isConnected (){
        return Boolean(this.session);
    }


    getInfo (){
        return {
            id: 'TestExt',
            name: 'TestExt',
            color1: '#DE5277',
            color2: '#AA3F5B',
            color3: '#AA3F5B',
            showStatusButton: true,

            blocks: [
                {
                    opcode: 'test1',
                    blockType: BlockType.COMMAND,
                    text: 'ABCDEF [VALUE]',
                    arguments: {
                        VALUE: {
                            type: ArgumentType.NUMBER,
                            defaultValue: 123
                        }
                    }
                },
                {
                    opcode: 'test2',
                    blockType: BlockType.REPORTER,

                    text: 'Random Value [MAX]',
                    arguments: {
                        MAX: {
                            type: ArgumentType.NUMBER,
                            defaultValue: 100
                        }
                    }
                },
            ]
        };
    }

    test1 (args){
        console.log('test1', args.VALUE);
    }

    test2 (args){
        return Math.random()
    }


}

module.exports = TestExt;
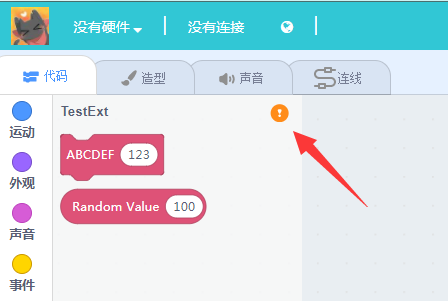
点击这个按钮将会打开通信选择的面板,不同硬件通信方式在图标上有不同的定义。
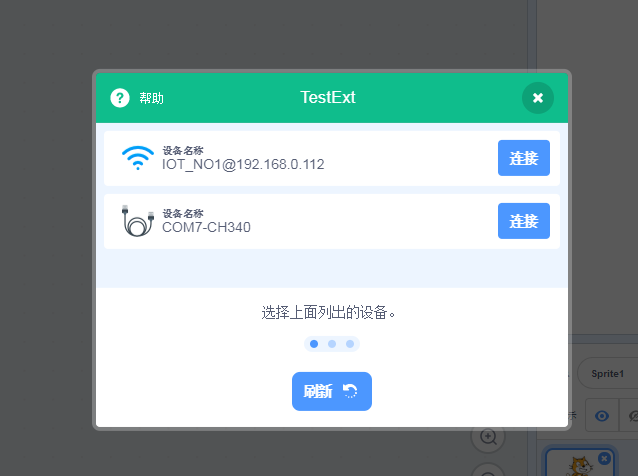
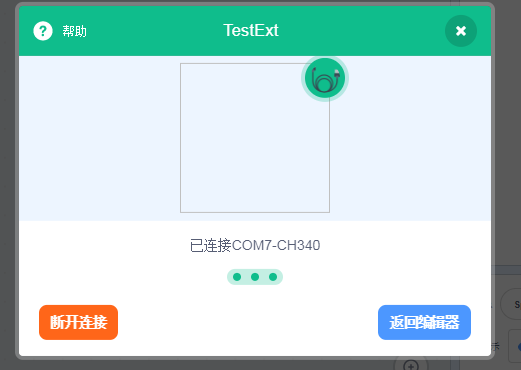
之后只要选择其中一个通信接口连接上去就行了。
当用户选择打开通信端口,kittenblock底层会自动调用插件的connectDevice方法,打开成功后会将通信实例(session)返回给插件。
插件需要对该session赋予onmessage和onclose两个方法,这两个方法针对每个插件都有可能不同。下面只是一个例子:
onmessage (data){
    const dataStr = new TextDecoder().decode(data);
    this.lineBuffer += dataStr;
    if (this.lineBuffer.indexOf('\n') !== -1){
        const lines = this.lineBuffer.split('\n');
        this.lineBuffer = lines.pop();
        for (const l of lines){
            if (this.reporter) this.reporter(l);
        }
    }
}

onclose (error){
    log.warn('on close', error);
    this.session = null;
    this.runtime.emit(this.runtime.constructor.PERIPHERAL_ERROR);
}
当然我们还需要在构造函数中加上,保证这些异步函数具有同样的上下文
this.onmessage = this.onmessage.bind(this);
this.onclose = this.onclose.bind(this);
测试用的通信固件
为了让大家快速上手,这里我写了一个超级简单的arduino通信固件程序,当收到AXXX的时候会让4号脚上的舵机转动到对应的角度。当收到字母B的时候会返回A0口上的模拟值.
大家可以新建一个arduino项目并将下面代码烧录到主板上。
#include <Servo.h>

Servo servo;

void setup() {
  Serial.begin(115200);
  servo.attach(4);
}

char buf[32];
int index;

void loop() {
  while(Serial.available()){
    char c = Serial.read();
    buf[index++] = c;
    if (c == '\n'){
      buf[index] = '\0';
      if (buf[0] == 'A'){
        int degree = atoi(buf+1);
        servo.write(degree);
      } else if (buf[0] == 'B'){
        Serial.println(analogRead(A0));
      }
      index = 0;
    }
  }
}
使用硬件通信接口
这里我们以电脑上的串口为例子讲解下如何与硬件进行通信。当然前提是你的硬件上有一套通信用的固件。
我们为插件的类再加上两个新方法:
write (data){
    if (!data.endsWith('\n')) data += '\n';
    if (this.session) this.session.write(data);
}

report (data){
    return new Promise(resolve => {
        this.write(data);
        this.reporter = resolve;
    });
}
之后将之前的COMMAND类型模块改造一下:
test1 (args){
    this.write(`A${args.VALUE}\n`);
}
当执行这个方块的时候会在串口发送AXXX字符串,其中XXX就是方块中的变量值。
同理REPORTER模块也是这样的操作,不过我们需要让其返回一个promise并等待硬件的返回值。
test2 (args){
    return this.report(`B\n`).then(ret => (ret));
}
PS:注意重新加载插件需要手动重新连接串口,目前kittenblock不知道插件重新加载是否应该端口通信接口。
PS2: 如果你的插件有bug或者缺少回调函数导致通信底层进入不可知的专题,这时候需要重新启动kittenblock,后面我们会优化各种异常流程和bug捕捉。
PS3:请保证发给其他人用的插件都是调试ok的代码。
这节完整的代码
const ArgumentType = Scratch.ArgumentType; const BlockType = Scratch.BlockType; const formatMessage = Scratch.formatMessage; const log = Scratch.log;
class TestExt { constructor (runtime){ this.runtime = runtime; this.comm = runtime.ioDevices.comm; this.session = null;
    this.runtime.registerPeripheralExtension('TestExt', this);

    // session callbacks
    this.onmessage = this.onmessage.bind(this);
    this.onclose = this.onclose.bind(this);
}

// method required by vm runtime
scan (){
    this.comm.getDeviceList().then(result => {
        this.runtime.emit(this.runtime.constructor.PERIPHERAL_LIST_UPDATE, result);
    });
}

connect (id){
    this.comm.connect(id).then(sess => {
        this.session = sess;
        this.session.onmessage = this.onmessage;
        this.session.onclose = this.onclose;
        // notify gui connected
        this.runtime.emit(this.runtime.constructor.PERIPHERAL_CONNECTED);
        setTimeout(() => {
            sess.write('M0\r\n');
        }, 2000);
    }).catch(err => {
        log.warn('connect peripheral fail', err);
    });
}

disconnect (){
    this.session.close();
}

isConnected (){
    return Boolean(this.session);
}

onmessage (data){
    const dataStr = new TextDecoder().decode(data);
    this.lineBuffer += dataStr;
    if (this.lineBuffer.indexOf('\n') !== -1){
        const lines = this.lineBuffer.split('\n');
        this.lineBuffer = lines.pop();
        for (const l of lines){
            if (this.reporter) this.reporter(l);
        }
    }
}

onclose (error){
    console.warn('on close', error);
    this.session = null;
    this.runtime.emit(this.runtime.constructor.PERIPHERAL_ERROR);
}

write (data){
    console.log("write", data);
    if (this.session) this.session.write(data);
}

report (data){
    return new Promise(resolve => {
        this.write(data);
        this.reporter = resolve;
    });
}


getInfo (){
    return {
        id: 'TestExt',
        name: 'TestExt',
        color1: '#DE5277',
        color2: '#AA3F5B',
        color3: '#AA3F5B',
        showStatusButton: true,

        blocks: [
            {
                opcode: 'test1',
                blockType: BlockType.COMMAND,
                text: 'ABCDEF [VALUE]',
                arguments: {
                    VALUE: {
                        type: ArgumentType.NUMBER,
                        defaultValue: 123
                    }
                }
            },
            {
                opcode: 'test2',
                blockType: BlockType.REPORTER,

                text: 'Random Value [MAX]',
                arguments: {
                    MAX: {
                        type: ArgumentType.NUMBER,
                        defaultValue: 100
                    }
                }
            },
        ]
    };
}

test1 (args){
    this.write(`A${args.VALUE}\n`);
}

test2 (args){
    return this.report(`B\n`).then(ret => (ret));
}
}
module.exports = TestExt;
下一节我们将讲述如何将方块翻译成c++、python等等不同的代码并编译下载。